Search for images or info
Blending Pencil Drawings
It's no secret that blending pencil drawings provides you with a great variety of interesting effects. A blending stump is commonly used to blur or smudge graphite but it can also be used with charcoal, crayons etc. It consists of tightly wound, soft paper and it resembles a pencil that's been sharpened on both ends.
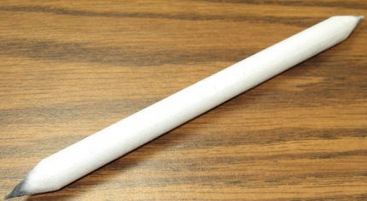
Blending pencil drawings is the perfect solution when you feel an illustration is missing a bit of oomph. For example, a simple, blurred line can instantly give the appearance of shadow on an object. It doesn't take much effort so if you like simplicity, this tool is right for you.
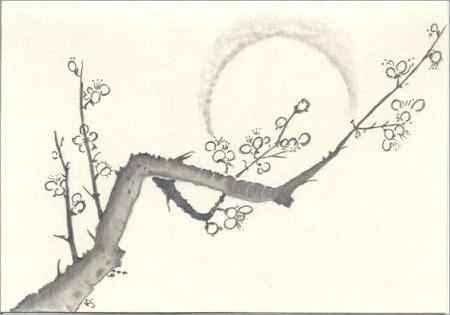
Recently, when I was drawing on a blank card for a birthday gift, I chose to illustrate a branch of Cherry Blossoms with the perception of the moon in the background. The perspective was one of looking up at the branch so the sky became the backdrop.
First, I needed to find a circular shape to use as a guide for the moon. I didn't really want to try my luck freehand -- the card paper had a beautiful texture and now wasn't the time to test the resiliency of it by using an eraser.
My circular template was too small so I quickly looked around and found a small, round jar that looked perfect for the job.
I gently placed it on the card and lightly drew around the bottom with a 2B pencil. I didn't want a full circle, just a three quarter, upper view.
Next, I needed to decide how to depict the moon without it being glaring or ugly. In my mind, I wanted a shadowy effect, something light yet visible.
A blending stump was obviously my best option but I'm not in the habit of blending pencil drawings and I was going into unfamiliar territory -- on a birthday card!! However, with the old saying of "nothing ventured, nothing gained" drumming in my head, I went ahead with that idea.
The image below shows the result on cream-colored card stock with a pearly, textured grain:
Categories
Sketches
Instruction
Freebies
Other Areas
** Disclaimer: I receive a small commission if you buy via my links -- at no extra cost to you. **
The How To Sketch Guide
Here's a book that finally dispels the mystery of sketching!
... it only takes a little instruction
or guidance... Read more >>
The grain in the paper helped give the final impression I wanted for the moon. I also gently glided over some pencil marks on the trunk to smooth them out so 2 different effects were achieved with the same tool. The whole image was created with a 2B mechanical pencil and I'm extremely happy with the outcome.
Remember to use the stump carefully and not with a heavy hand, otherwise it's very easy to ruin a drawing.
It truly is amazing how much difference it makes when you try blending pencil drawings and it doesn't matter what skill level you're up to, it's something anyone can do.
Add Depth To Drawings
The next drawing was created on a similar textured card and when I initially viewed it, I felt the pull to add a little bit of depth to the petals of the Magnolia. I was reluctant to add random strokes because the drawing had a serenity to it that I didn't want to lose. After applying the blending stump sparingly to each petal, I liked the final effect it gave to the overall image:
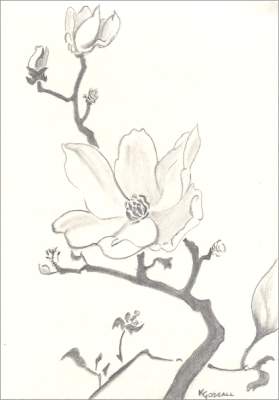
I took a photo of this drawing and as I viewed it some time later, I noticed I had omitted blending on the petal at the front. I did add some, but forgot to take another photo before I gave the card away. :(
It's good practice to give a drawing a final check-up after you have moved away and left it alone for a while. Any inconsistency will show itself when you view it with fresh eyes.
When you don't keep your artwork, try to get a copy first because these images record your adventure and growth as a hobby artist.
I feel as though I have advanced into a new realm of the artistic world. It's fascinating that something as simple as blending pencil drawings can lead to new beginnings. This is why we all have different learn to draw paths, there are so many tangents to explore!
It's natural to delve into other areas so try to be open and allow this progression to happen on its own accord.
Compare Shading Techniques
The examples below show the difference between cross-hatching and blending in shadows:
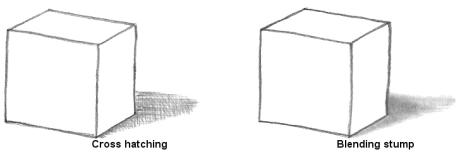
The smooth, smudged graphite clearly demonstrates the effect of blending for the box shadow on the right. Either method is acceptable for shading so it's up to you which way you choose to do it.
If you want a darker tone on the stump-tip, grab some spare paper and shade a solid area with an 8B pencil, then rub the stump across it. Hold the stump at an angle so the tip doesn't get damaged.
In the early days, before I invested in any kind of drawing tools, I used a cotton tip for smoothing graphite. It does a similar job to a blending stump except the tip is a lot larger and a bit restricting because of that.
Stumps have a pencil-like tip and you can get into all kinds of nooks and crannies. Fortunately, blending stumps are very inexpensive so that allows everyone to have a good variety of sizes to play with.
This art form has infinite possibilities so let it take you wherever because no one says you can't go back and change it. When you experiment with blending pencil drawings or anything else that's new and different, always acknowledge your achievements and be proud of them.
Click a link below to view some different pencil techniques:
* Allaboutdrawings.com is a participant in the Amazon Services LLC Associates Program, an affiliate advertising program designed to provide a means for sites to earn advertising fees by advertising and linking to Amazon.com.
Copyright © 2005 - 2025 www.allaboutdrawings.com. All rights reserved.


