Search for images or info
Introducing the Measure and Mark Method
The measure and mark method is a term I mentally give to this helpful drawing tip that I use consistently. The good news is that you are able to produce an image quite successfully, without pain or frustration marring the experience.
The main aim of any drawing exercise is to achieve good co-ordination of hand and eye.
It is important to depend on your eyes and put down your first impression, rather than using a mechanical method, but some of us just need a kick start in the right direction. This is where measuring comes into play.
Experiment One In Detail
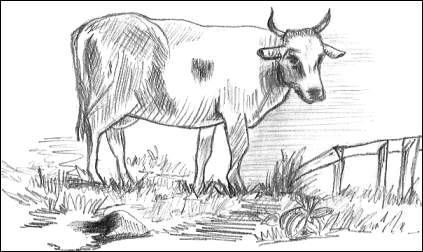
I chose to draw a cow using the measure and mark method because I am not completely confident doing animals. I'll accept any helping hand to simplify the process and get initial proportion under control.
Handy Tip: I printed out my reference picture so I could position my sketch underneath to gauge where everything belongs.

- Use a ruler to roughly measure the border and rule a page accordingly.
- Measure from the border to the back side of the cow and place a dot.
- Next, measure the width of the beast to the other extremity (the ear) and mark that point. I put a few other marks around including ones for the position of legs and distance from ground to under the belly.
- As I study the reference picture, I note that the 2 front feet are closer to the bottom border than the rear feet because of sloping ground so I scribble that in as a quick guide. I give the original one last quick study.
- Now it's time to lightly sketch in the outline while constantly referring to the original. Do stronger lines once you know it's looking good.
- When you're finished, remove all stray lines and tidy up appropriately.
Without using the measure and mark method, I'm sure the process would take heaps more time that I can't always spare.
Categories
Sketches
Instruction
Freebies
Other Areas
** Disclaimer: I receive a small commission if you buy via my links -- at no extra cost to you. **
The sketches on this page are produced using a 2B mechanical pencil and a white plastic eraser.
Experiment Two - Japanese Landscape
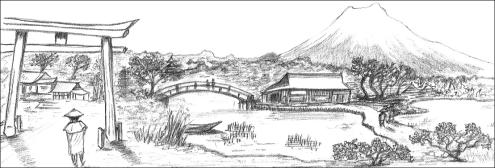
It is so important to depict things or scenes that appeal to you because it makes the task easier and more enjoyable. As soon as I saw this next painted scene in a book, I just knew I had to replicate it in pencil.
The painting covered the whole width of a page so I turned my sketchbook sideways to accommodate it. Luckily, this particular reference picture was located at the top of a page, so I was able to place my sketchbook directly underneath it and still have a firm surface. Now I can easily judge borders and place indicators using the measure and mark method without a ruler - close enough is good enough.
I interspersed drawing with sketching to arrive at the final overall effect.
My original is around 7 inches wide by 3 inches high so please click the image to enlarge.
A Japanese landscape featuring the magnificent Mount Fujiyama.
I used the sharp edge of a white plastic eraser to highlight the snow on the mountain. Another great tool to help you erase in awkward places is an erasing shield. The surrounding parts of your drawing are safe from smudging or disruption when you use something like that.
I chose to omit some things from the original so generally did some fiddling and scribbling to fill in odd gaps. I feel very satisfied with the resulting image, this is one to put in my 'show' sketchbook for my family and friends.
I make my own sketchbooks so I can add and remove pages, without having to destroy the ones I don't want to display. The instructions for making sketchbooks is a bonus product when you own the 'How To Sketch' book.
Experiment Three - A Charming Old Landscape
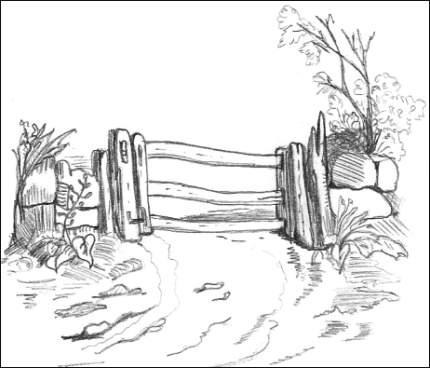
Another picture that took my eye was an old one of a gate with a stone fence, typical of the era in which the original sketch was created.
The measure and mark method is probably not necessary for such a simplistic scene but I was in the groove and continued to use the helpful markers.

- I made some light marks to indicate the overall size of the original image but didn't worry about ruling in any lines to construct a border.
- Next step was to mark the height and distance between the main posts and lightly sketch in the railings.
- When I was certain of correct placement, I finished the image without too much fuss or bother. No lines were erased in the creation of this landscape as the original markers just blended in.
On occasion I use borders and at other times I use the edge of my paper as a guide. It depends on what I draw or copy and my mood at the time does come into consideration! I can swing between lazy and productive so that is usually a factor in the final results.
When you browse for pictures to copy, listen to your inner voice for indication that an image appeals and looks achievable to you. These are the ones that you can produce successfully.
Just by using the measure and mark method, you are accepting support and one huge benefit is that your confidence grows rapidly.
If you are willing to experiment and acknowledge a few failures along the way, you will produce some really good illustrations. Failures are merely stepping stones to better drawings in the future.
Any spare time that you can devote to artwork is truly worthwhile and you won't ever regret it.
Click a link below to view a good variety of pencil tips:
* Allaboutdrawings.com is a participant in the Amazon Services LLC Associates Program, an affiliate advertising program designed to provide a means for sites to earn advertising fees by advertising and linking to Amazon.com.
Copyright © 2005 - 2025 www.allaboutdrawings.com. All rights reserved.


